Sales just signed three new partners this quarter, and each of them needs SFTP access. Without a defined process you will improvise three slightly different setups: one with a key emailed over Gmail, one with a password because the partner could not generate a key in time, and one shoved into a shared service account because nobody wanted to wait for the ticket. Six months later, when the auditor asks who has access to what, you will not have a good answer.
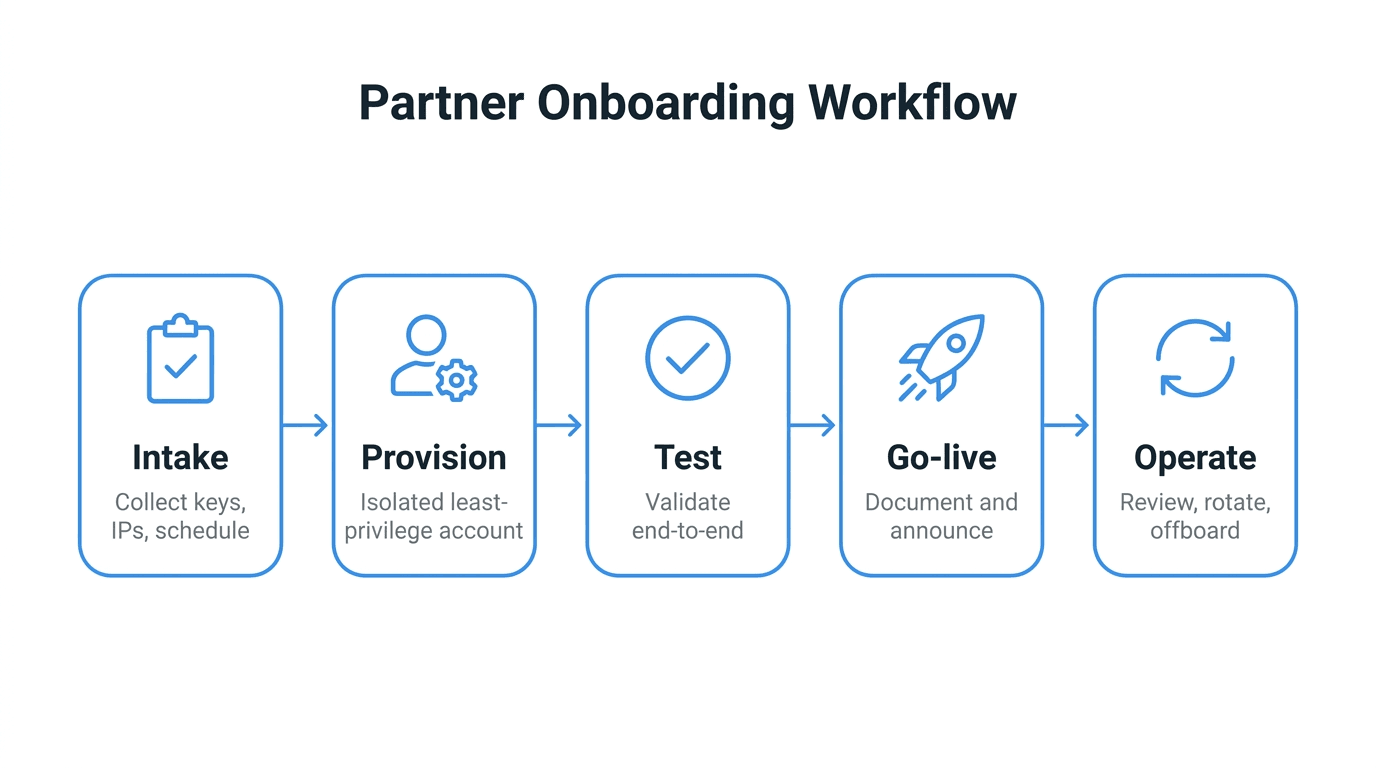
Partner onboarding works best when it is a workflow, not a side quest. This guide lays out the lifecycle, from intake to offboarding, so the second and third partners go as smoothly as the first.
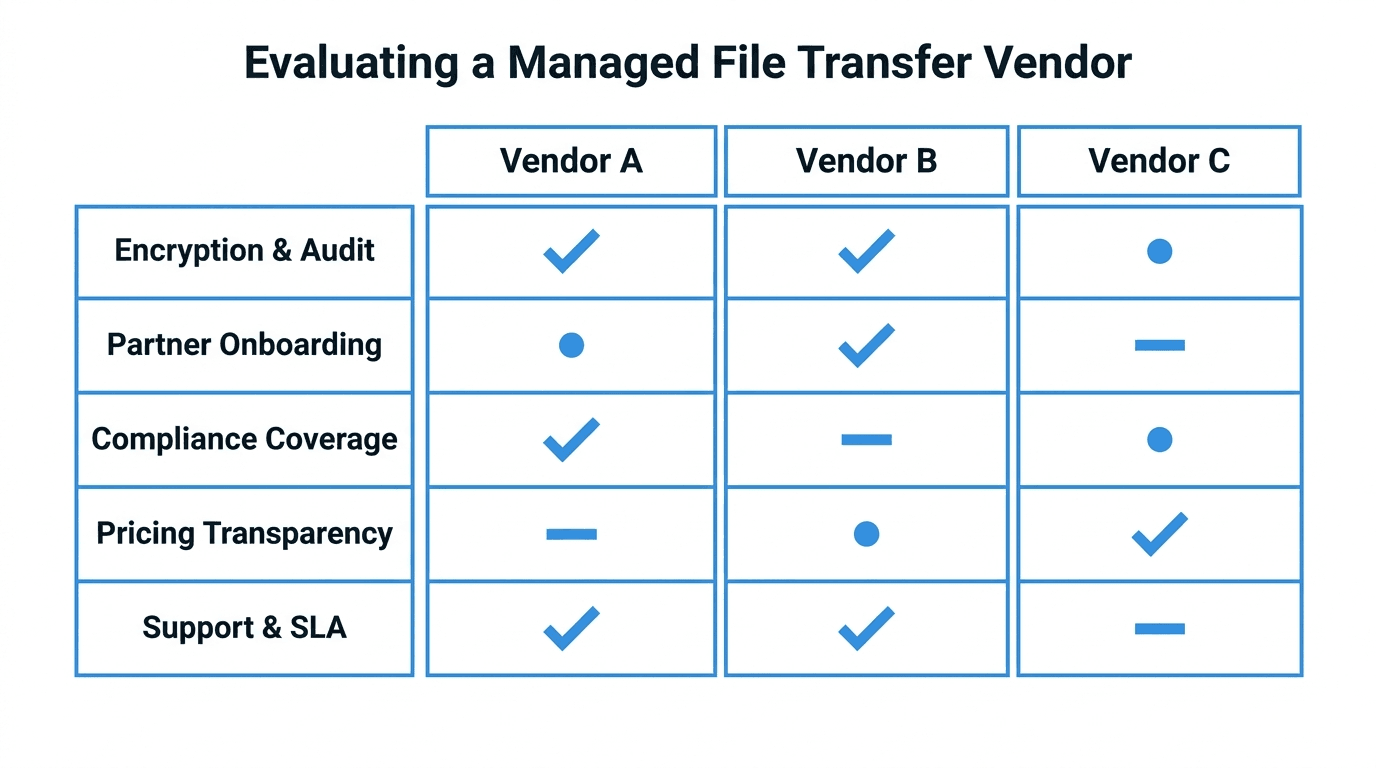
What "onboarding a partner" actually means
Creating a user account is the smallest part of the job. A full onboarding includes:
- Intake of the partner's technical details and access needs
- Provisioning an isolated, least-privilege account with the right controls
- Validation with test transfers before any real data flows
- Go-live with documentation, ownership, and observability in place
- Operations through key rotations, access reviews, and eventual offboarding
Skipping any phase is what leads to a server with eighteen accounts, no documented owners, three dormant keys from staff who left two years ago, and a vague suspicion that two of those accounts might still be in use.
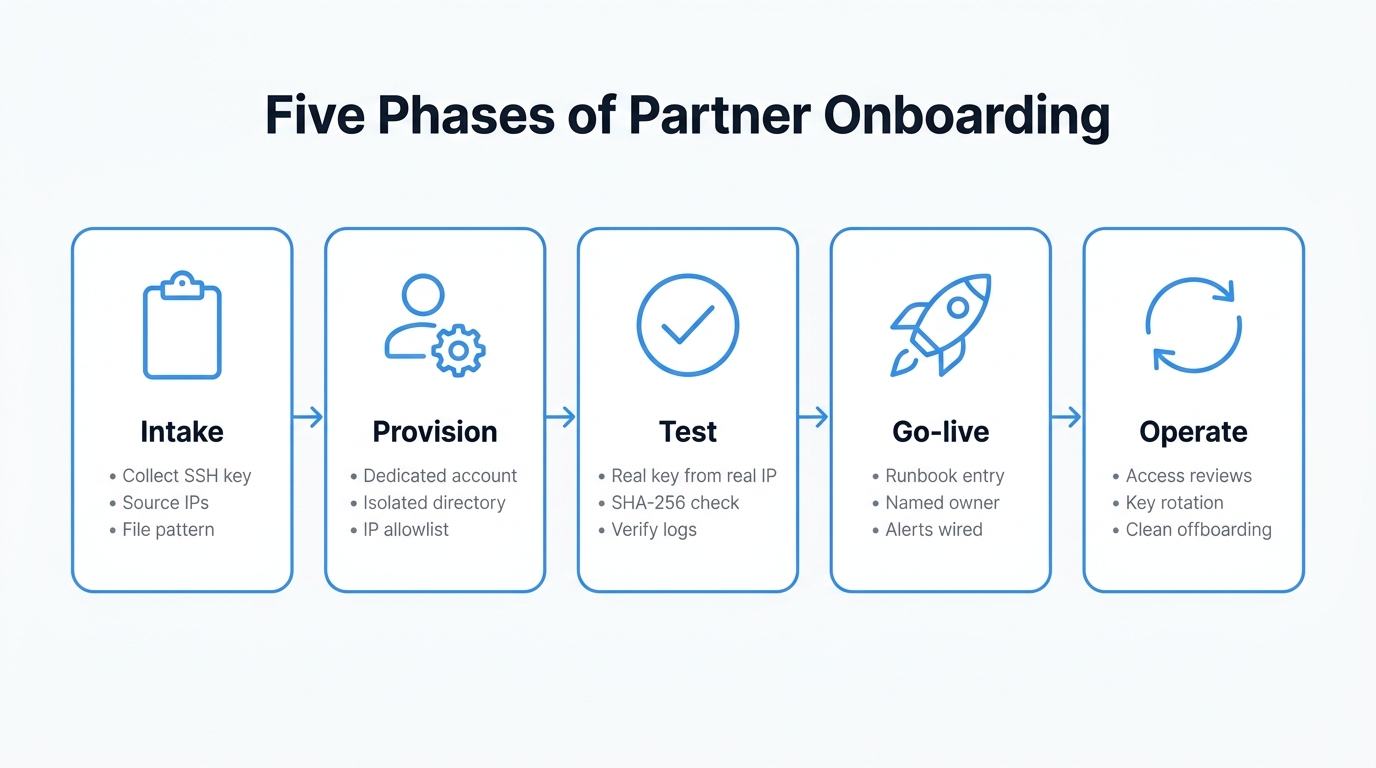
Phase 1: Intake
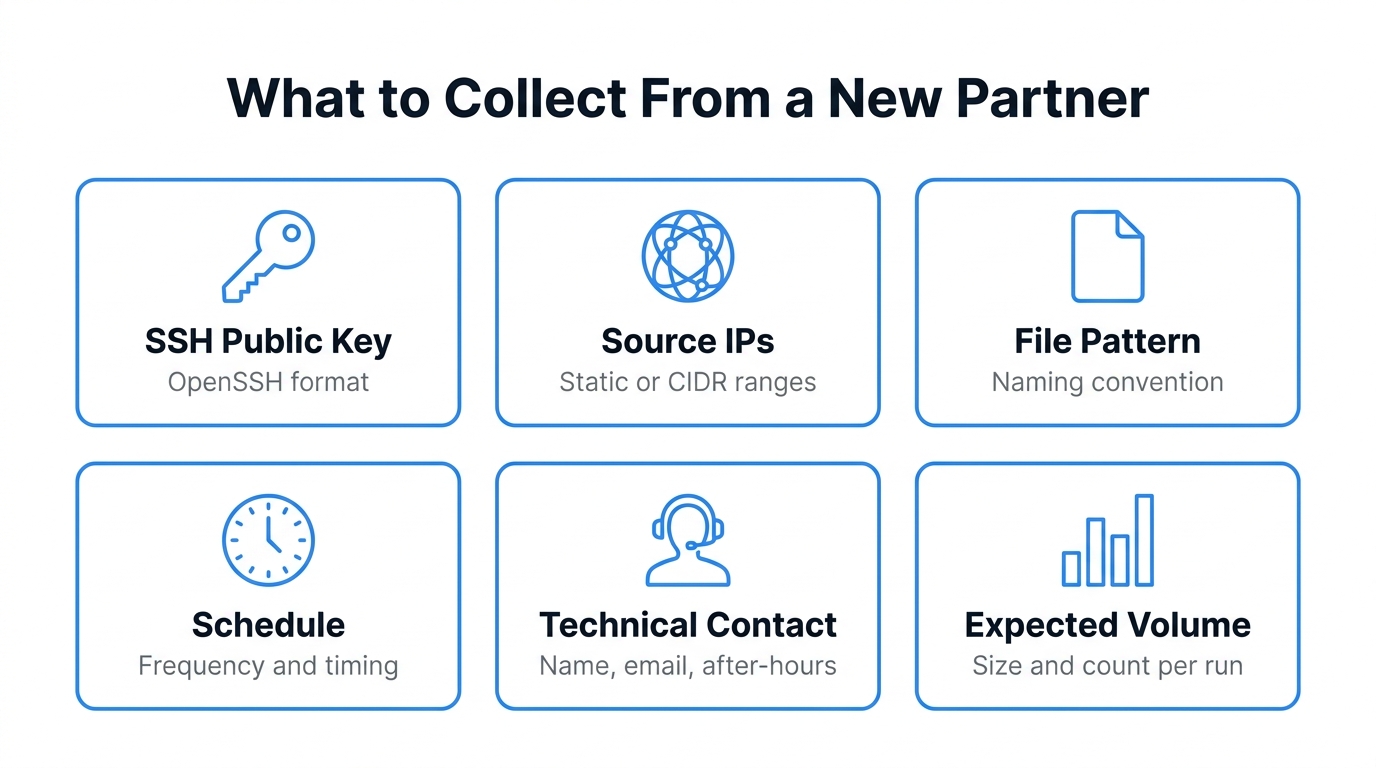
Before any account exists, get the answers to a fixed set of questions. Treat this as a checklist that goes out as part of the onboarding kickoff.
What to collect from the partner:
- SSH public key in OpenSSH format. Reject passwords by default. If the partner cannot produce a key, send them to the SSH keys beginner guide and wait.
- Source IP addresses or CIDR ranges they will connect from. Static IPs are easiest. If they use NAT pools or cloud egress ranges, ask for the documented ranges in writing.
- Direction of transfer. Are they uploading to you, downloading from you, or both?
- File patterns and naming conventions they will use.
orders_YYYYMMDD.csvis far easier to automate against than "whatever the export tool spits out." - Expected schedule and volume. A 50 MB nightly drop is a different operational profile than a 5 GB hourly batch.
- Technical contact with a name, email, and an out-of-hours phone or Slack contact. This person is who you call when their files stop arriving at 2 AM.
What to send them in return:
- Hostname, port, and username
- Directory layout they will see after login, including where to write versus where finished files land
- File naming convention they should follow
- Any size, count, or retention limits
- A test endpoint or staging directory they can use for a dry run
Capturing this in a shared form or ticket template, rather than reconstructing it from email threads each time, is what makes onboarding repeatable.
Phase 2: Provisioning
Now the account gets created, with isolation and least-privilege baked in from the start.
- Dedicated account per partner. Never share an account across partners, no matter how convenient it seems. Shared accounts make audit trails meaningless and offboarding impossible.
- Isolated directory scope. Each partner should only see their own files. Use a virtual filesystem or chroot to enforce this, not just permissions you hope nobody pokes at.
- Least-privilege scoping. If a partner only uploads, give them write-only access to an inbox. If they only download, give them read-only on the relevant directory. Default to denying everything else.
- Key-only authentication. Install the partner's public key on their account. Disable password fallback. This eliminates an entire class of brute-force risk.
- IP allowlist. Restrict the account to the source IPs gathered during intake. The IP allowlist guide covers the patterns. This is your second line of defense if a key ever leaks.
- Quotas and limits. Set reasonable size or connection caps so one partner cannot starve the others.
If you find yourself granting broader access "just for now to get them going," stop. Onboarding shortcuts become production configuration faster than anyone expects.
Phase 3: Validating with test transfers
Before announcing go-live, prove that the path actually works end to end. A successful login is not the same as a successful workflow.
A good test cycle includes:
- Authentication test from the partner's actual source IPs, with the actual key. A connection from your laptop using a copy of the key does not validate IP allowlists.
- Upload or download of a representative test file. Use the real file naming convention, not
test.txt. - Integrity check. Compute a SHA-256 on both sides and compare. SFTP confirms bytes arrived, not that they arrived intact end to end through whatever wrapper logic both sides use.
- Downstream consumption. If the file feeds an ELT job, a workflow engine, or a manual review, run that step against the test file too. Most onboarding failures are not in the SFTP layer; they are in the parser one step downstream.
- Observability check. Confirm that the test session appears in your audit log, in your monitoring dashboard, and in any SIEM forwarding. If a real session would be invisible, fix that before going live.
Keep the test file around. When the workflow breaks in three months, having a known-good reference makes triage dramatically faster.
Phase 4: Go-live and documentation
Going live is not a single moment. It is a small set of artifacts that make the connection operable by people who were not in the original kickoff call.
- Runbook entry. Hostname, partner contact, file patterns, expected schedule, what "healthy" looks like, and what to do when it is not.
- Named owner on your side. Someone whose job description includes responding when this connection breaks. "The platform team" is not an owner.
- Escalation path. Who gets paged for failures, in what order, with what severity.
- SIEM and monitoring confirmed. Logs are flowing, dashboards exist, and at least one alert is wired up. A missed expected upload is usually the first one worth having.
- Communication of the go-live to anyone downstream who depends on the files.
Documentation written during onboarding stays accurate. Documentation written six months later, after a near-miss, rarely does.
Phase 5: Ongoing operations
The connection is live, but onboarding is not over. A few recurring tasks keep it healthy:
- Access reviews on a fixed cadence (quarterly works for most teams). Confirm the account is still needed, still owned by someone, and still scoped correctly.
- Key rotation at least annually, or whenever the partner's technical contact changes. Treat key rotation as routine maintenance, not a crisis.
- Volume and behavior drift. A connection that suddenly transfers ten times its usual volume is either a real change worth knowing about or a sign that something is misconfigured upstream.
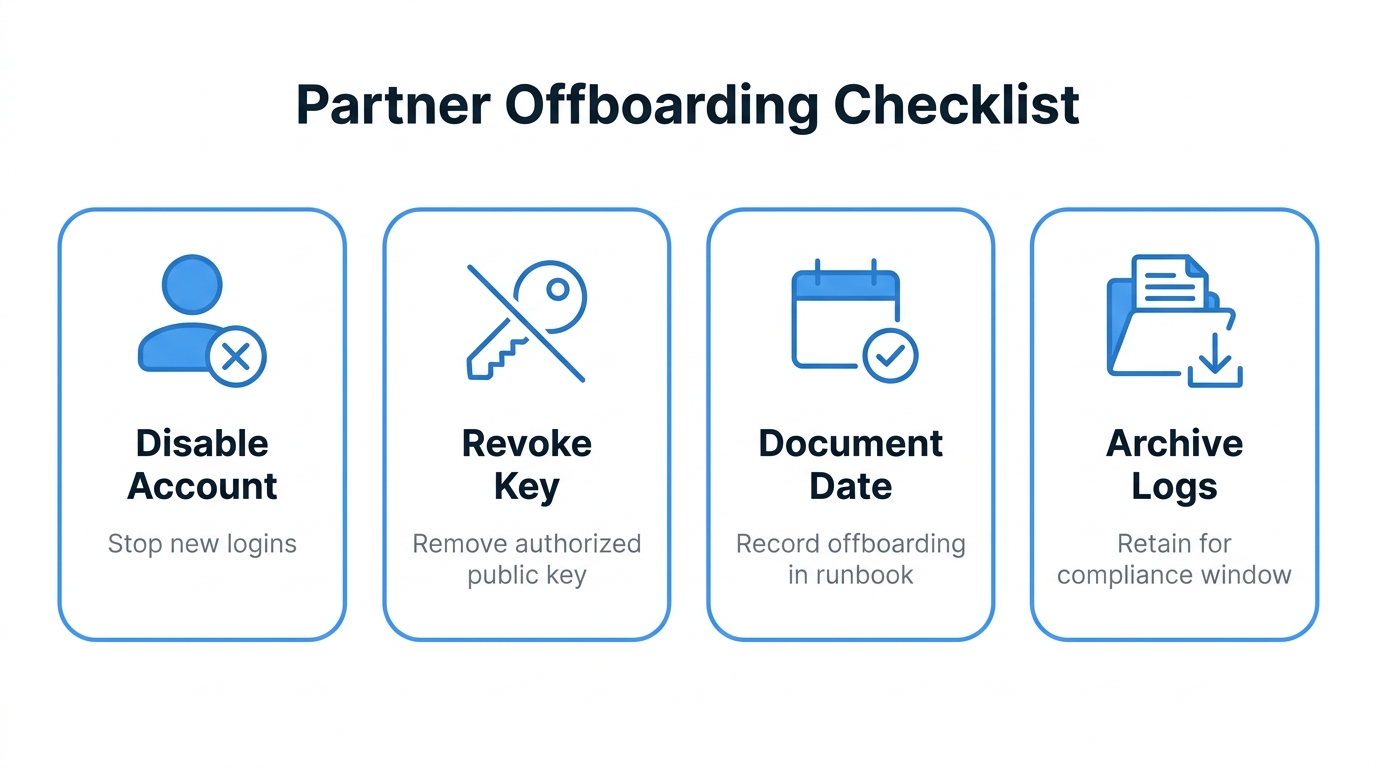
- Offboarding when the relationship ends. Disable the account, revoke the key, document the date, and archive the audit log for the retention window your compliance program requires. Do not just delete and forget. A clean offboarding record matters during the next audit.
Common pitfalls
A few mistakes show up over and over:
- Sharing keys over email or Slack DMs. Even a public key is better exchanged through a tracked channel that you can later prove was used. Private keys, of course, never leave their owner.
- Reusing accounts across partners because the directory layout "happens to work." Audit trails immediately become useless.
- Skipping the IP allowlist on receive-only endpoints because "they are write-only, what is the risk?" The risk is that a leaked key plus a writable inbox is a great place to drop malware that your downstream pipeline will dutifully process.
- No offboarding process. Accounts that should have been deactivated linger for years. Every one of them is a potential incident.
- Treating onboarding as a one-off project per partner. The third partner should be faster than the first. If it is not, the workflow is broken, not the partners.
How FilePulse fits
FilePulse is built to make this workflow boring. Each partner gets an isolated tenant with its own virtual directory, per-account IP allowlist, key-based authentication, and audit log. Provisioning is form-driven rather than file-driven, so the intake checklist maps directly into the configuration. Access reviews, key rotations, and offboarding all live in the same UI, with the audit trail attached. See the B2B file exchange guide for how this plays out across many partners at once.
You can run the same workflow on a hand-rolled OpenSSH server. The phases do not change. FilePulse just removes the parts where the workflow leaks into shell scripts and tribal knowledge.
Next step: Map your current onboarding process against the five phases above and identify which one is the weakest link for your team. Start a free FilePulse trial if you want a place to run the workflow without rebuilding the plumbing yourself.